Recently, my company was entrusted with some interior renderings for a church. The project is an auditorium with a relatively low ceiling that makes a non inviting space, with fluorescent lights scattered throughout the area, with unattractive colors and crammed with uncomfortable furniture.
The idea of the architect is to turn that space into a pleasant meeting place and replicate the elegance and prestige that currently has the nave of the church. This case study is a perfect example to continue the topic of how to make vaulted ceilings in Sketchup, how to prepare images and textures for use on floors or as wallpapers, or how to create curved lighting fixtures.
All the space was modeled in Sketchup and rendered in 3DMax. In the coming posts I will tell you how we did it. Today I will start with the lighting fixtures.
The picture provided by the architect indicated that the lamps would be like the photo except for the color of the glass that should be white.
We checked the image that had double-curved shade and other curved faces. To simplify our work we decided to use Extrusion Tools plug-in developed by TGI. One of the guidelines that we follow when we create renderings is to keep the geometry as simple as possible with the least number of edges and avoid any unnecessary detail due to distance or point of view will not be seen.
The first step was drawing two concentric circles with 12 sides each instead of the default 24. In this way we could make the edges smoother without need to involve many faces and at the same time to work with 6 sections to recreate the shade.We created a vertical face on which we draw the shade curve and then we copied it at 60 degrees.
Then we copy the outer arc at the top. We delete unnecessary lines and we used the Extrude Edges by Rails. In order we chose the upper curve, the two rails and finally the lower arc for the melting curve. To all the answers we answered no except for smooth edges. The result is as shown in the picture.
Then we copy the outer arc at the top. We delete unnecessary lines and we used the Extrude Edges by Rails. In order we chose the upper curve, the two rails and finally the lower arc for the melting curve. To all the answers we answered no except for smooth edges. The result is as shown in the picture.
Once created the first group we made 5 copies with rotation and then grouped the 6 sections to form the shade.
For the metal frame we drew a rectangle in the XY plane and use Edge Extrude Faces by using the arc as profile. Then we made 5 copies with rotation every 60 degrees and grouped them. Using the Outliner is essential to separate and hide the various groups and subgroups that we created.
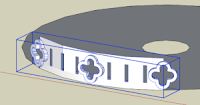
For the ring perimeter simply we changed the number of edges of the base circle at 24 and then apply Pull / Push tool. We deleted the entities that we did not need leaving 4 segments of the curve.
Separately we created a prism and the rosette groups to intersect the faces of the ring. We omitted most curved edges to simplify the model. We placed groups on the ring.
After applying Intersect Faces with Selection we deleted the prisms and the intersected faces. We created a component which we rotated and copied. Using Ctrl + erase we removed the joint edges.
Finally we created the center and hangers using Push / Pull and Follow Me.


